Building simple servers with Flask introduces the basics of creating web applications using a lightweight and flexible Python framework.
Flask allows developers to set up web servers quickly, define routes, and handle HTTP requests with minimal configuration. It is well suited for beginners as well as for small to medium web applications.
What is Flask and Why Use It?
Flask is a micro web framework for Python that lets you build web servers with minimal code.
It handles HTTP requests, routes URLs to functions, and renders dynamic pages—extending your HTML/CSS/JS sites into full apps.
Unlike full-stack frameworks like Django, Flask gives you control without built-in extras, making it perfect for learning core concepts.
Key Features of Flask
Flask shines in simplicity and flexibility. Here's what sets it apart:
1. Minimalist Design: Core is under 30KB; add only what you need via extensions.
2. Routing: Map URLs to Python functions easily (e.g., /home → home()).
3. Template Engine: Jinja2 integrates seamlessly with your HTML for dynamic content.
4. Debug Mode: Built-in server reloads on changes for fast iteration.
5. Werkzeug Integration: Handles secure cookies, sessions, and request parsing.

This table shows Flask's sweet spot for your web dev journey—quick wins without bloat.
Setting Up Your Flask Environment
Start with a clean setup to avoid pitfalls. You'll need Python 3.8+ (Flask supports up to 3.12 as of 2025) and a virtual environment for isolation.
Step-by-Step Installation
Follow these numbered steps on Windows, macOS, or Linux:
1. Install Python: Download from python.org if not installed. Verify with python --version.
2. Create Virtual Environment:
python -m venv flask_env

# Activate: source flask_env/bin/activate (Linux/Mac) or flask_env\Scripts\activate (Windows)
3. Install Flask:
pip install flask4. Verify: Run flask --version (should show 3.x).
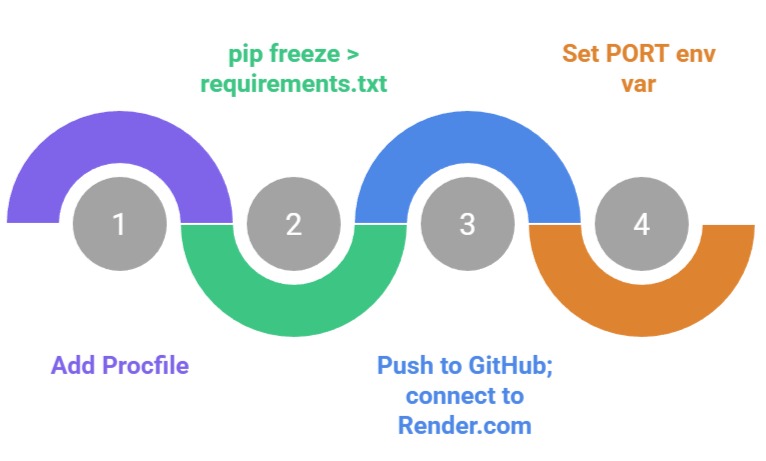
Pro Tip: Use requirements.txt for reproducibility—pip freeze > requirements.txt.
Creating Your First Flask Server
Time to code! A basic server responds to requests, serving HTML you built earlier.
Hello World Example
Create app.py:
from flask import Flask


app = Flask(__name__)


@app.route('/')

def home():

    return '<h1>Hello, Flask! Your first dynamic server.</h1>'


if __name__ == '__main__':

    app.run(debug=True)
Run with python app.py. Visit http://127.0.0.1:5000/—your browser shows live HTML! The debug=True enables auto-reload.
This builds on your HTML skills: Flask serves dynamic pages, not static files.
Adding Multiple Routes
Expand to a multi-page site:
@app.route('/about')

def about():

    return '<h2>About Our Web App</h2><p>Built with HTML, CSS, JS, and Flask!</p>'


@app.route('/user/<name>')

def user(name):

    return f'<h2>Welcome, {name}!</h2>'  # Dynamic path variable
Now /user/Alice greets "Welcome, Alice!"—introducing URL parameters.
Handling HTTP Methods and Forms
Servers aren't just GET requests. Learn POST for forms, tying into your JavaScript event handling.
GET vs. POST in Flask
1. GET: Fetches data (e.g., loading a page).
2. POST: Submits data (e.g., login forms).
Use methods in routes
from flask import request


@app.route('/login', methods=['GET', 'POST'])

def login():

    if request.method == 'POST':

        username = request.form['username']

        return f'<h2>Logged in as {username}!</h2>'

    return '''

        <form method="POST">

            Username: <input type="text" name="username">

            <input type="submit" value="Login">

        </form>

    '''
This creates a self-handling form—test it live!
Best Practice: Always validate inputs (e.g., if not username: return 'Error').
Rendering Templates with Jinja2
Ditch hardcoded HTML. Flask's Jinja2 engine lets you mix Python logic with your templates.
Template Basics
1. Create templates/ folder.
2. Add home.html
<!DOCTYPE html>

<html>

<head><title>Flask App</title></head>

<body>

    <h1>Welcome, {{ name }}!</h1>

    <ul>

    {% for item in items %}

        <li>{{ item }}</li>

    {% endfor %}

    </ul>

</body>

</html>
3. Update app.py
from flask import render_template


@app.route('/dynamic/<name>')

def dynamic(name):

    return render_template('home.html', name=name, items=['HTML', 'CSS', 'JS', 'Flask'])
Visit /dynamic/Bob—Jinja2 renders personalized lists! {{ }} inserts variables; {% %} controls flow.
Error Handling and Best Practices
Robust servers handle failures gracefully.
Common Errors and Fixes
1. 404: Use @app.errorhandler(404) for custom pages.
2. 500: Debug mode shows traces; production uses app.run(debug=False).
Security Best Practices
1. Sanitize inputs: from markupsafe import escape.
2. Use environment variables for secrets: os.environ.get('SECRET_KEY').
3. Enable HTTPS: in production.
 Deploying Your Flask App
Go live! Use Render or Heroku for free tiers.
Quick Deployment Steps