Django project setup, models, views, and the admin interface form the core structure of a Django web application.
Project setup establishes the configuration and layout of the application, models define how data is stored and managed in the database, views handle application logic and user requests, and the admin interface provides a built-in tool for managing application data.
Setting Up Your Django Project
Django projects follow a structured approach that ensures scalability and maintainability.
Proper setup creates a solid foundation for your web application, integrating seamlessly with your frontend HTML/CSS/JavaScript skills.
Prerequisites and Environment Setup
Before coding, ensure you have the right tools installed. Django requires Python 3.8+ and a virtual environment for dependency management.
1. Install Python: Download from python.org (verify with python --version)
2. Create virtual environment:
python -m venv django_env

source django_env/bin/activate  # Windows: django_env\Scripts\activate
3. Install Django: pip install django==5.1 (latest stable as of 2025)
Creating Your First Django Project
Follow these steps to scaffold your project structure:
django-admin startproject mywebapp .

cd mywebapp

python manage.py startapp core
Project structure overview
mywebapp/

├── manage.py

├── mywebapp/

│   ├── __init__.py

│   ├── settings.py

│   ├── urls.py

│   └── wsgi.py

└── core/

    ├── migrations/

    ├── admin.py

    ├── apps.py

    ├── models.py

    ├── views.py

    └── urls.py
Running Your Development Server
Test your setup with Django's built-in development server:
1. Apply migrations: python manage.py migrate
2. Create superuser: python manage.py createsuperuser
3. Start server: python manage.py runserver
4. Visit http://127.0.0.1:8000/ to see Django's welcome page
Pro Tip: Use python manage.py runserver 0.0.0.0:8000 to access from other devices on your network.
Django Models: Structuring Your Data
Models define your application's data structure using Python classes. They create database tables automatically and handle data validation, relationships, and queries.
Creating Your First Model
Open core/models.py and define a Post model for a blog application
from django.db import models
from django.contrib.auth.models import User
class Post(models.Model):
title = models.CharField(max_length=200)
content = models.TextField()
author = models.ForeignKey(User, on_delete=models.CASCADE)
created_at = models.DateTimeField(auto_now_add=True)
updated_at = models.DateTimeField(auto_now=True)
is_published = models.BooleanField(default=False)
def __str__(self):
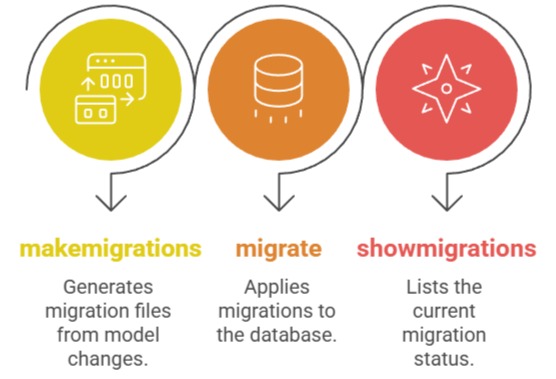
return self.titleMaking and Applying Migrations
Convert your models to database tables:
1. Create migration: python manage.py makemigrations core
2. Apply migration: python manage.py migrate
3. Verify: Check db.sqlite3 or your database
Migration Commands Reference
Django Views: Handling Requests and Responses
Views contain the business logic that processes HTTP requests and returns responses. They connect your models to templates and URLs.
Function-Based Views (FBV)
Simple views for basic functionality. Create core/views.py:
from django.shortcuts import render

from .models import Post


def home(request):

    posts = Post.objects.filter(is_published=True)[:5]

    return render(request, 'home.html', {'posts': posts})


def post_detail(request, pk):

    post = Post.objects.get(id=pk)

    return render(request, 'post_detail.html', {'post': post})
Class-Based Views (CBV) - Recommended
More powerful and reusable. Update core/views.py
from django.views.generic import ListView, DetailView

from .models import Post


class PostListView(ListView):

    model = Post

    template_name = 'home.html'

    context_object_name = 'posts'

    queryset = Post.objects.filter(is_published=True)

    paginate_by = 10


class PostDetailView(DetailView):

    model = Post

    template_name = 'post_detail.html'
URL Configuration and Routing
Connect views to URLs using Django's URL dispatcher.
Project URLs (mywebapp/urls.py)
from django.contrib import admin

from django.urls import path, include


urlpatterns = [

    path('admin/', admin.site.urls),

    path('', include('core.urls')),

]
App URLs (core/urls.py)
from django.urls import path

from . import views


urlpatterns = [

    path('', views.PostListView.as_view(), name='home'),

    path('post/<int:pk>/', views.PostDetailView.as_view(), name='post_detail'),

]
URL Pattern Parameters
1. <int:pk>: Captures integers (primary key)
2. <slug:title>: Captures URL-friendly strings
3. name='home': Named patterns for reverse URL resolution
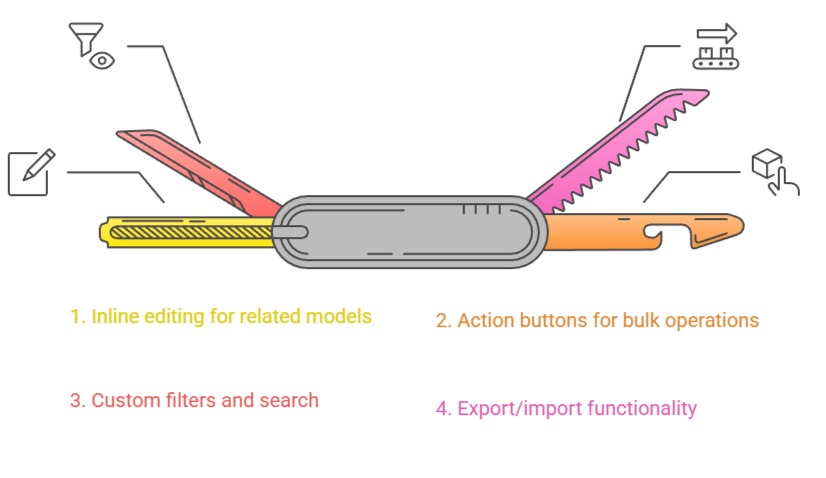
Django Admin Interface: Powerful Content Management
Django's admin interface provides instant CRUD (Create, Read, Update, Delete) functionality without frontend coding.
Registering Models in Admin
Edit core/admin.py
from django.contrib import admin

from .models import Post


@admin.register(Post)

class PostAdmin(admin.ModelAdmin):

    list_display = ['title', 'author', 'created_at', 'is_published']

    list_filter = ['is_published', 'created_at', 'author']

    search_fields = ['title', 'content']

    list_editable = ['is_published']

    date_hierarchy = 'created_at'
Admin Customization Options
1. list_display: Columns shown in list view
2. list_filter: Sidebar filters
3. search_fields: Searchable fields
4. list_editable: Inline editing
Accessing Admin Interface
1. Create superuser: python manage.py createsuperuser
2. Access: http://127.0.0.1:8000/admin/
3. Add/edit: Posts through intuitive interface
Admin Features