Git is the most widely used version control system in the world, and its workflow revolves around three core actions: committing, branching, and merging. These three operations are the heartbeat of day-to-day development in Git.
They allow individuals to save their work meaningfully, teams to develop features in parallel without interfering with each other, and everyone to bring their work together in a controlled and organized way.
Understanding the Git Workflow
Before diving into commits, branches, and merges individually, it helps to understand how Git thinks about your work. Git manages files across three key areas:
1. Working Directory: This is where you actively edit files on your local machine. Any changes you make to files happen here first.
2. Staging Area (Index): This is a preparation zone where you select which changes you want to include in your next commit. Not every change has to be committed at once.
3. Repository (Local): This is where Git permanently stores committed snapshots of your project history.
4. Remote Repository: This is the shared version of the repository hosted on a platform like GitHub or GitLab, where the entire team pushes and pulls code.
The typical flow of work moves through these areas in sequence:
Working Directory → Staging Area → Local Repository → Remote Repository
(edit) (stage) (commit) (push)
Commit — Saving Meaningful Snapshots of Your Work
A commit is the action of permanently recording a snapshot of your staged changes into the Git repository. Every commit is like a photograph of your project at a specific moment in time, and Git keeps every photograph ever taken, in order, forever.
Each commit contains:
1. The actual changes made to files.
2. A unique identifier called a commit hash (e.g., a3f92bc).
3. The author's name and email.
4. A timestamp.
5. A commit message — a short description of what was changed and why.
Commits are what make your project's history readable, traceable, and recoverable.
The Commit Process Step by Step
Here is how a typical commit flows in Git:
Step 1 — Make changes to your files
Open any file in your project and make your edits. Git will detect that the file has changed.
Step 2 — Check the status of your changes

This command shows you which files have been modified, which are staged, and which are untracked. It is always a good idea to run this before staging or committing.
Step 3 — Stage your changes

This moves a specific file to the staging area. To stage all changed files at once:

Staging gives you control — you decide exactly what goes into each commit. You might have changed five files but only want to commit two of them right now. Staging makes that possible.
Step 4 — Commit the staged changes

The -m flag allows you to write your commit message directly in the command. The message should be clear, concise, and descriptive — explaining what was done and why.
Writing Good Commit Messages
A commit message is a note to your future self and your teammates. A poor commit message like "fixed stuff" tells nobody anything useful. A good commit message is specific and meaningful.
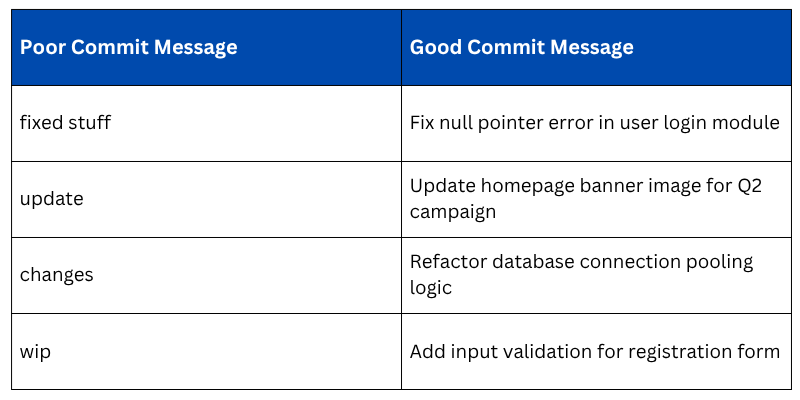
Best Practices for Commit Messages
1. Use the imperative mood — "Add feature" not "Added feature".
2. Keep the subject line under 72 characters.
3. Explain why the change was made, not just what was changed.
4. Commit one logical change at a time, do not bundle unrelated changes into a single commit.
Viewing Commit History
To see all commits made in a repository:

For a more compact, readable view:

This shows each commit on a single line with its short hash and message are very useful for quickly scanning project history.
Undoing a Commit
To undo the last commit but keep your changes in the working directory:

To undo the last commit and discard the changes entirely:

Use --hard with caution as it permanently discards changes and cannot be undone easily.
Branch — Developing in Parallel Without Conflict
A branch in Git is an independent line of development. Think of the main codebase as a river, a branch is a separate stream that splits off from the main river, flows independently, and can eventually flow back into it.
Branching allows developers to work on new features, bug fixes, or experiments without touching the main codebase until the work is ready.
By default, every Git repository starts with one branch — typically called main (or historically, master). This branch should always represent the stable, production-ready version of the code.
Why Branching Matters
Without branching, all developers would be committing directly to the same codebase simultaneously — a recipe for conflicts, broken code, and chaos. Branching solves this elegantly:
1. Each feature is developed in its own isolated branch.
2. Multiple developers can work in parallel without stepping on each other's work.
3. The main branch stays clean and stable at all times.
4. Unfinished or experimental work never disrupts the live product.
5. Code can be reviewed and tested on a branch before being integrated.
Working with Branches — Step by Step
Create a new branch:

This creates a new branch called feature/user-login but does not switch to it yet.
Switch to the new branch:

Or, create and switch to a new branch in a single command:

In newer versions of Git, you can also use:

List all branches:

The branch with an asterisk (*) is the one you are currently on.
Switch between branches:

Delete a branch after it is no longer needed:

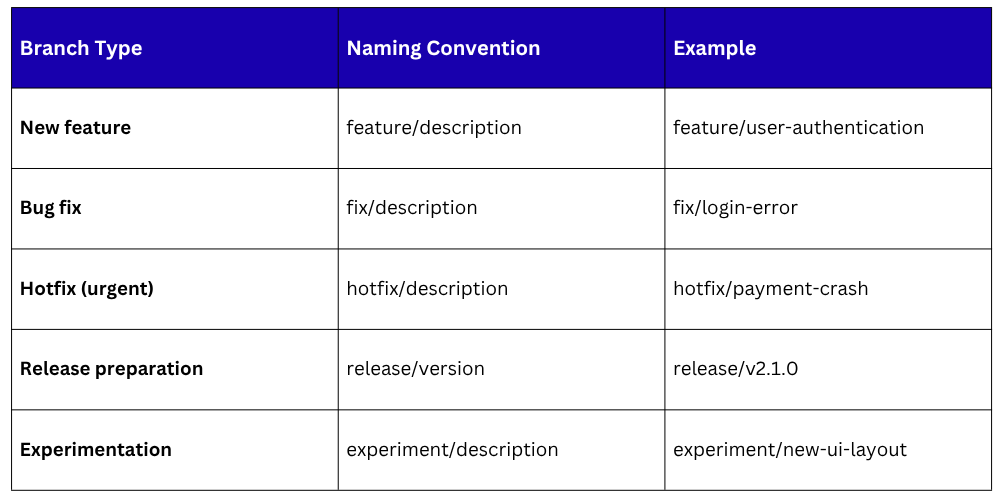
Branch Naming Conventions
Good branch names make a repository easy to navigate. Here are widely used naming conventions:
Common Branching Strategies
Different teams use different strategies for managing branches. Two of the most common are:
1. Git Flow: A structured branching model with dedicated branches for features, releases, and hotfixes. Best suited for projects with scheduled releases.
2. Trunk-Based Development: Developers work on very short-lived branches and merge back into the main branch frequently — sometimes multiple times a day. Best suited for teams practicing continuous delivery.
Merge — Bringing Work Back Together
Merging is the process of integrating the changes from one branch into another. Once a feature is complete, tested, and reviewed on its own branch, it is merged back into the main branch so that the entire team benefits from those changes.
Merging is how independent streams of work eventually come together into a single, unified codebase.
Performing a Merge — Step by Step
Step 1 — Switch to the branch you want to merge INTO (usually main)

Step 2 — Merge the feature branch into main:

Git will now integrate all the commits from feature/user-login into main.
Types of Merges in Git
Git performs different types of merges depending on the situation:
1. Fast-Forward Merge: This happens when the main branch has not changed since the feature branch was created. Git simply moves the main branch pointer forward to include the new commits — no new commit is created.

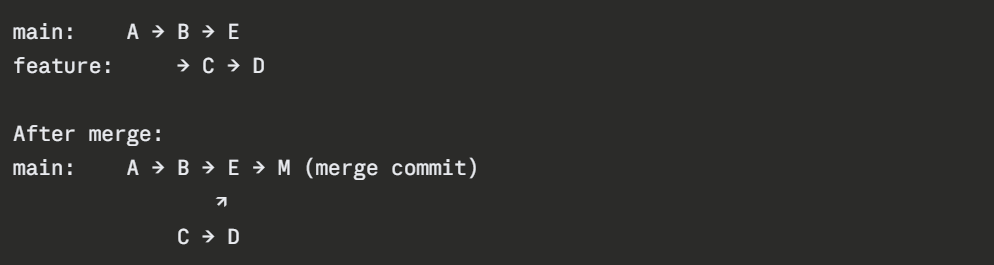
2. Three-Way Merge
This happens when both the main branch and the feature branch have new commits since the branch was created. Git creates a new merge commit that combines both lines of work.
Handling Merge Conflicts
A merge conflict occurs when two branches have made different changes to the same part of the same file, and Git cannot automatically decide which version to keep. This is a normal part of collaborative development — not something to fear.
When a conflict occurs, Git will mark the conflicting sections in the file like this:
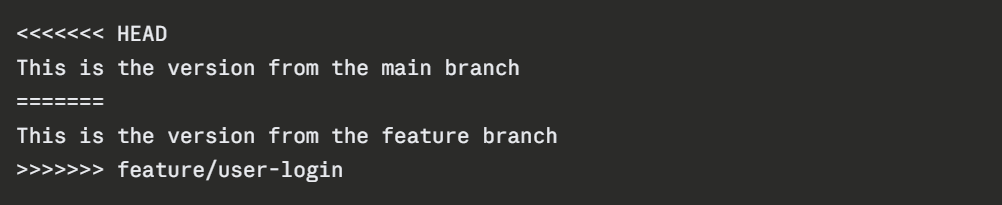
To resolve the conflict:
1. Open the file and review both versions.
2. Edit the file to keep the correct version (or combine both).
3. Remove the conflict markers (<<<<<<<, =======, >>>>>>>).
Stage the resolved file:

Complete the merge with a commit:

Pull Requests
In real-world team environments, merges are rarely done directly from the command line. Instead, developers open a Pull Request (PR) — also called a Merge Request (MR) in GitLab — on platforms like GitHub or GitLab.
A pull request is a formal request to merge one branch into another. It enables:
1. Code review — teammates review the changes before they are merged
2. Discussion — comments and suggestions can be made on specific lines of code
3. Automated checks — CI/CD pipelines run tests automatically before merging is allowed
4. Approval gates — one or more approvals may be required before a merge can proceed
This process ensures that no code reaches the main branch without being reviewed and verified, a critical quality control step in professional DevOps teams.
The Complete Git Workflow in Practice
Here is what a complete, real-world Git workflow looks like from start to finish:
1. git checkout main # Start from the main branch
2. git pull # Get the latest changes from remote
3. git checkout -b feature/signup # Create and switch to a new branch
4. # Make your code changes...
5. git status # Review what has changed
6. git add . # Stage all changes
7. git commit -m "Add user signup form with validation" # Commit
8. git push origin feature/signup # Push branch to remote repository
9. # Open a Pull Request on GitHub/GitLab
10. # Team reviews and approves the PR
11. git checkout main # Switch back to main
12. git merge feature/signup # Merge the approved branch
13. git branch -d feature/signup # Delete the branch — work is done
This workflow is clean, traceable, collaborative, and professional, and it is the foundation of how Git is used in virtually every DevOps team in the world.