Software development is rarely a solo activity. Teams of developers spread across offices, cities, or even continents need to collaborate on the same codebase simultaneously. This is where remote repositories come in.
What is a Remote Repository?
A remote repository is a Git repository that is hosted on a remote server — typically on platforms such as GitHub, GitLab, or Bitbucket, rather than on your local machine.
While your local repository exists only on your computer, a remote repository is accessible to all authorized team members over the internet or a private network.
Think of it this way:
1. Your local repository is your personal workspace — where you write, experiment, and commit code.
2. The remote repository is the shared workspace — where everyone's work comes together.
Key characteristics of a remote repository:
1. It serves as the single source of truth for the project.
2. It is accessible by multiple developers simultaneously.
3. It stores the complete project history, just like a local repository.
4. It enables collaboration features like pull requests, code reviews, and issue tracking.
5. It integrates directly with CI/CD pipelines to trigger automated builds and deployments.
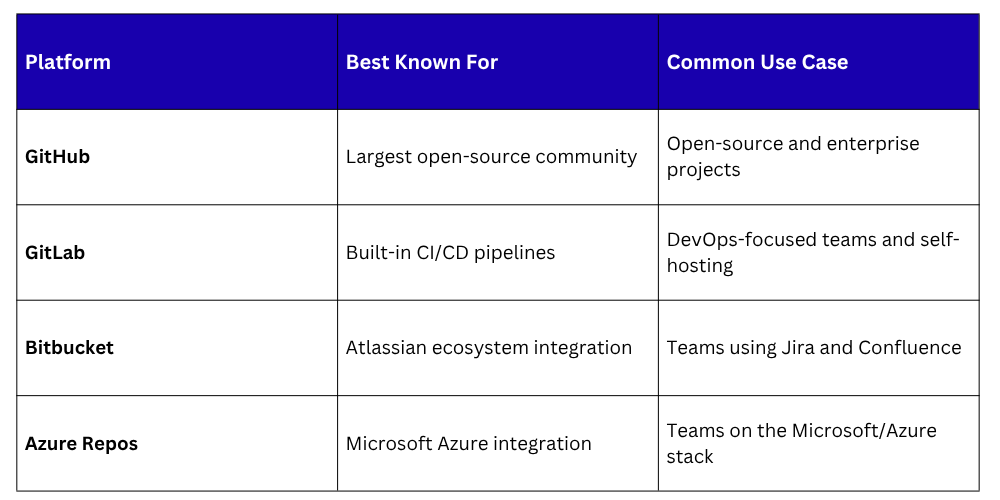
Common Remote Repository Hosting Platforms
Several platforms are widely used to host remote Git repositories. Each offers similar core functionality with their own additional features:
Connecting Your Local Repository to a Remote
Before you can push or pull code, your local repository needs to know where the remote repository is. This connection is established using a remote URL — the address of the remote repository.
Adding a remote repository to an existing local repository:

Here, origin is the name given to the remote. This is simply an alias — a shortcut so you do not have to type the full URL every time. By convention, the primary remote is almost always named origin.
Verifying your remote connections:

This command lists all configured remotes along with their URLs. The output typically looks like this:

Changing a remote URL (useful if the repository is moved or renamed):

Removing a remote connection:

Cloning a Remote Repository
When you want to start working on a project that already exists in a remote repository, you clone it. Cloning creates a complete copy of the remote repository on your local machine, including all files, branches, commits, and history.
Cloning a repository:

This creates a new folder on your machine named after the repository, containing everything in it. Git automatically sets up the remote connection named origin pointing back to the URL you cloned from — so you are ready to push and pull right away.
Cloning into a specific folder name:


What Happens When You Push?
While you are working on your local machine, your teammates are pushing their own changes to the remote repository. To stay up to date, you need to pull those changes down to your local machine.
Pulling the latest changes:

This command does two things in sequence:
1. Fetches the latest changes from the remote.
2. Merges them into your current local branch.
Pulling from the tracked upstream branch (if upstream is already set):

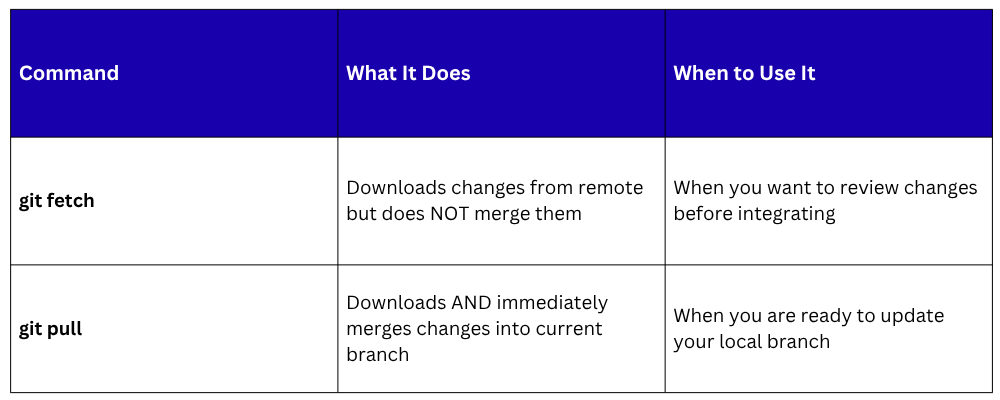
Fetch vs. Pull
A common point of confusion for beginners is the difference between git fetch and git pull. Here is a clear breakdown:
Fetching without merging:

After fetching, you can review the changes before deciding to merge:

Then merge manually when ready:

Working with Remote Branches
When working in teams, branches exist both locally and on the remote. Understanding how to manage remote branches is an important part of collaborative Git work.
Viewing all remote branches:

Viewing both local and remote branches:

Checking out a remote branch locally (to work on a branch that a teammate created):

Or using the shorter modern syntax:

Deleting a remote branch (after it has been merged and is no longer needed):

A Typical Remote Collaboration Workflow
Here is what a realistic day-to-day remote collaboration workflow looks like for a developer on a team:
1. git clone https://github.com/org/project.git
# Clone the project (first time only)
2. git checkout main # Switch to the main branch
3. git pull origin main # Get the latest changes before starting
4. git checkout -b feature/notifications
# Create a new branch for your work
5. # Write code, make changes...
6. git status # Review changed files
7. git add . # Stage all changes
8. git commit -m "Add email notification service"
# Commit with a meaningful message
9. git push -u origin feature/notifications
# Push your branch to the remote
10. # Open a Pull Request on GitHub
11. # Team reviews and approves
12. # Branch is merged into main on GitHub
13. git checkout main # Switch back to main locally
14. git pull origin main # Pull the latest merged changes
15. git branch -d feature/notifications
# Clean up your local branch
This workflow ensures that:
1. The main branch is always up to date and stable.
2. All work is reviewed before being integrated.
3. The team's remote repository is always the single source of truth.
4. Every developer's local environment stays in sync with the team.
Common Issues When Working with Remotes
Even experienced developers encounter issues when working with remote repositories. Here are the most common ones and how to handle them:
1. Rejected Push — Remote Has New Changes
If someone else has pushed to the remote branch since your last pull, Git will reject your push:

Solution — Pull first, resolve any conflicts, then push:

2. Authentication Errors
If Git asks for credentials or returns a permission error, your authentication may need to be updated. Modern GitHub and GitLab use Personal Access Tokens (PATs) or SSH keys instead of passwords.
To set up SSH-based authentication, generate an SSH key and add it to your GitHub/GitLab account settings:

3. Diverged Branches
If your local and remote branches have diverged (both have new commits the other does not have), you will need to either merge or rebase:

1. Always pull before you start working — Begin every session by pulling the latest changes to avoid working on outdated code.
2. Push frequently — Do not accumulate large amounts of uncommitted or unpushed work; push regularly so the team can see your progress.
3. Use branches for all new work — Never push directly to main in a team environment.
4. Write clear commit messages before pushing — Once commits are pushed to a shared remote, others can see them.
5. Use Pull Requests for merging — This ensures all code is reviewed before reaching the main branch.
6. Delete merged branches — Keep the remote repository clean by removing branches that have already been merged.