A CI/CD pipeline is the automated assembly line that carries code from a developer's commit all the way through building, testing, and deployment, without requiring manual steps at every stage.
Think of it as a series of checkpoints that code must pass through before it is considered ready for users. Each checkpoint serves a specific purpose, and together they form a reliable, repeatable path from code to production.
What is a CI/CD Pipeline?
A CI/CD pipeline is a defined sequence of automated stages or steps, that code changes pass through after being committed to a version control repository.
It is triggered automatically by an event, most commonly a code push or the opening of a pull request, and it runs without any manual intervention unless a deliberate approval step is configured.
The pipeline acts as an automated gatekeeper:
1. It validates that code compiles and builds correctly.
2. It verifies that all tests pass.
3. It checks code quality and security.
4. It delivers the application to the appropriate environment.
5. It reports the result back to the team immediately.
If any stage fails, the pipeline stops, the team is notified, and no broken code moves forward. This is what makes a pipeline a powerful quality control mechanism.
Anatomy of a Basic CI/CD Pipeline
A basic CI/CD pipeline is made up of clearly defined stages, each containing one or more jobs. A stage represents a logical phase of the pipeline, and jobs are the individual tasks that run within that stage.
Here is the structure of a fundamental CI/CD pipeline:
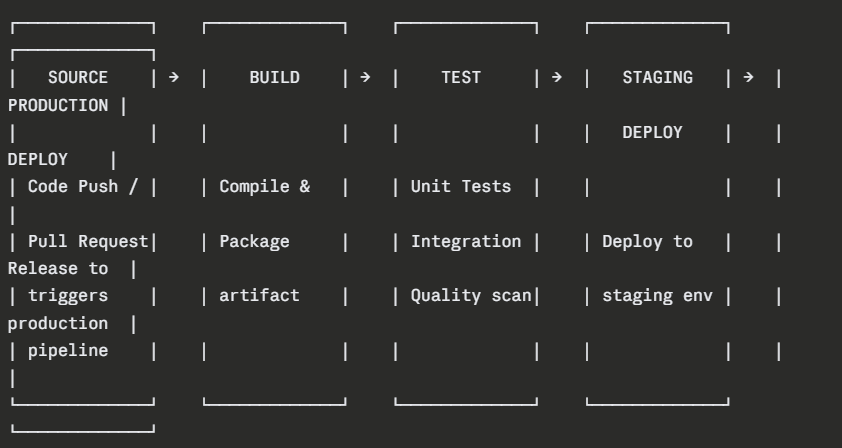
Stage 1 — Source (Trigger)
The pipeline begins the moment a developer pushes code or opens a pull request. The CI/CD system watches the repository for these events and responds by starting the pipeline automatically.
Common trigger events:
1. A push to any branch
2. A push specifically to the main or develop branch
3. The opening or updating of a pull request
4. A scheduled time-based trigger (e.g., nightly builds)
5. A manual trigger initiated by a team member
Nothing in this stage requires configuration beyond defining which events start the pipeline. It is the entry point — the starting gun.
Stage 2 — Build
The build stage takes the raw source code and transforms it into a deployable artifact. This is where the application is compiled, dependencies are resolved, and the output is packaged.
What typically happens in the build stage:
1. The CI system checks out the latest code from the repository.
2. All required dependencies are downloaded and resolved.
3. The source code is compiled (where applicable).
4. The application is packaged into its final deployable form.
5. The artifact is stored for use in later stages.
If the build fails, perhaps due to a syntax error or a missing dependency — the pipeline stops immediately and reports the failure. No further stages run.
Stage 3 — Test
The test stage is where automated quality checks run against the built application. This stage typically contains multiple jobs running different types of tests:
1. Unit tests — Fast, isolated tests of individual functions and components.
2. Integration tests — Tests that verify components work correctly together.
3. Code quality analysis — Static analysis tools check for code smells, complexity, and maintainability.
4. Security scanning — Automated tools scan for known vulnerabilities in code and dependencies.
Tests run in a specific order fastest first — so that failures are caught as early as possible. If any test fails, the pipeline halts and the developer is notified with details about exactly what failed and why.
Stage 4 — Staging Deployment
Once all tests pass, the artifact is automatically deployed to a staging environment — a close replica of the production environment where final validation takes place.
In staging:
1. End-to-end tests may run against the live deployed application.
2. Performance and load tests can be executed.
3. Manual exploratory testing or user acceptance testing (UAT) can occur.
4. The team can verify that the application behaves exactly as expected in a production-like setting.
Staging is the last line of defence before production. It is where confidence is built before the final release.
Stage 5 — Production Deployment
The final stage delivers the application to production — the live environment where real users interact with it.
Depending on the team's approach:
1. In Continuous Delivery, a human approval is required before this stage runs.
2. In Continuous Deployment, this stage runs automatically if all previous stages pass.
Production deployments in modern pipelines use safe strategies to minimize risk:
 Pipeline Configuration — Defining Pipelines as Code
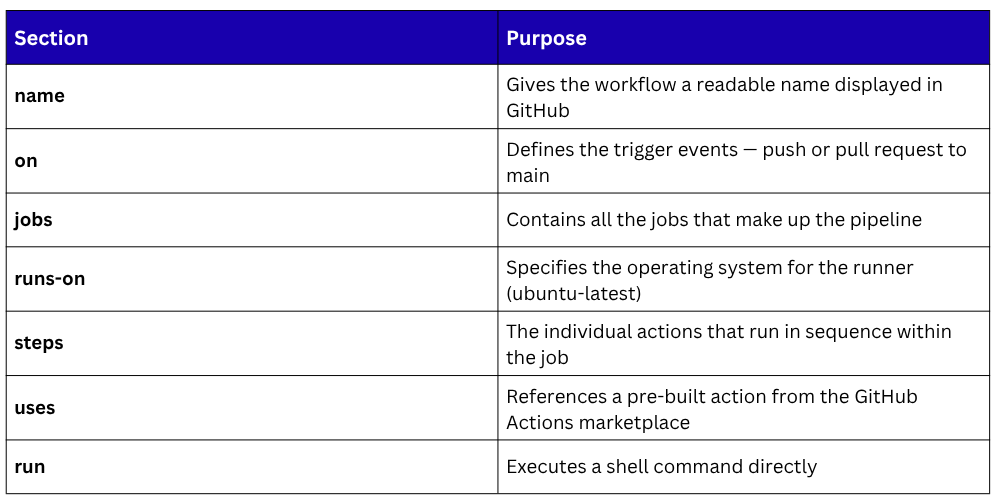
Modern CI/CD pipelines are defined using configuration files written in YAML — a simple, human-readable format. These files live inside the project repository alongside the application code, meaning the pipeline definition is version-controlled just like everything else.
This approach is called Pipeline as Code, and it brings significant advantages:
1. Pipeline changes are tracked, reviewed, and audited in version control.
2. Any team member can read and understand the pipeline configuration.
3. Pipelines can be tested, branched, and rolled back like any other code.
4. The same pipeline configuration runs consistently on any CI/CD system.
GitHub Actions — A Basic Pipeline Example
GitHub Actions is one of the most widely used CI/CD platforms today. Pipelines in GitHub Actions are called workflows and are defined in YAML files stored in the .github/workflows/ directory of the repository.
Here is a basic GitHub Actions workflow that builds and tests a Node.js application:
yaml
name: CI Pipeline
on:
push:
branches: [main]
pull_request:
branches: [main]
jobs:
build-and-test:
runs-on: ubuntu-latest
steps:
- name: Checkout code
uses: actions/checkout@v3
- name: Set up Node.js
uses: actions/setup-node@v3
with:
node-version: '18'
- name: Install dependencies
run: npm install
- name: Run build
run: npm run build
- name: Run tests
run: npm test
GitLab CI/CD — A Basic Pipeline Example
In GitLab, pipelines are defined in a file called .gitlab-ci.yml placed at the root of the repository. GitLab CI/CD uses the concept of stages explicitly, with jobs assigned to each stage.
Here is a basic GitLab CI/CD pipeline for a Python application:
yaml
stages:
- build
- test
- deploy
build-job:
stage: build
image: python:3.11
script:
- pip install -r requirements.txt
- echo "Build complete"
test-job:
stage: test
image: python:3.11
script:
- pip install -r requirements.txt
- pytest tests/
deploy-job:
stage: deploy
script:
- echo "Deploying to staging environment"
only:
- main
What this pipeline does:
1. build-job — Installs all Python dependencies defined in requirements.txt
2. test-job — Runs all automated tests using pytest
3. deploy-job — Deploys the application, but only when code is pushed to the main branch
The only: - main directive is an important control, it ensures the deployment job only runs when changes land on the main branch, not on every feature branch push.
Pipeline Environments and Variables
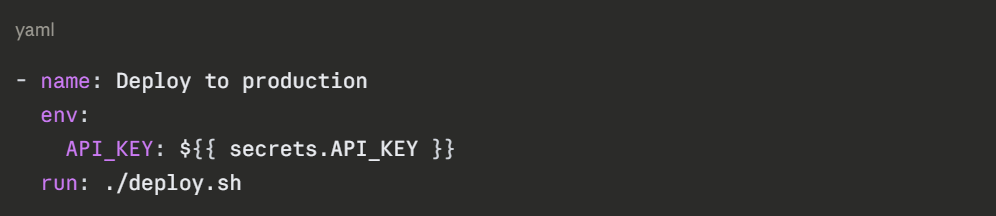
A pipeline typically deploys to multiple environments — development, staging, and production each with its own configuration. Sensitive values like API keys, database passwords, and deployment credentials must never be hardcoded in the pipeline file.
Both GitHub and GitLab provide secrets and environment variables that are stored securely in the platform and injected into the pipeline at runtime.
In GitHub Actions, secrets are defined in the repository settings and referenced like this:
In GitLab CI/CD, variables are defined in the project settings and used like this:

Best practices for pipeline variables:
1. Store all sensitive values as secrets — never as plain text in the YAML file.
2. Use environment-specific variables to separate staging and production configurations.
3. Rotate secrets regularly and audit who has access to them.
4. Use masked variables in GitLab to prevent secret values from appearing in job logs.
Pipeline Status, Notifications, and Visibility
One of the most valuable aspects of a CI/CD pipeline is the immediate visibility it provides. Every pipeline run produces a clear result — passed or failed, along with detailed logs showing exactly what happened at every step.
Pipeline status indicators:
Passed — All stages completed successfully; code is ready to progress.
Failed — One or more stages failed; details provided in the logs.
Running — Pipeline is currently executing.
Pending — Pipeline is queued and waiting for a runner.
Cancelled — Pipeline was manually stopped.
Notification integrations ensure the right people are informed immediately:
1. Email notifications sent to the author of the commit that triggered the pipeline.
2. Slack or Microsoft Teams messages posted to team channels.
3. Status badges displayed on the repository README showing the current pipeline state.
4. Pull request checks updated in real-time on GitHub or GitLab.
Common Pipeline Failures and How to Handle Them
Even well-designed pipelines encounter failures. Here are the most common issues and how to address them:

Best Practices for Building Basic Pipelines
1. Start simple — Begin with a basic build and test pipeline and add complexity gradually as the team matures.
2. Keep pipelines fast — Long-running pipelines slow down development. Aim for the build and test stages to complete within 10 minutes.
3. Run stages in the right order — Always run the fastest checks first so failures are caught as early as possible.
4. Use caching — Cache dependencies between pipeline runs to avoid re-downloading them every time, significantly reducing build times.
5. Never commit directly to main — Always use pull requests so the pipeline runs on the feature branch before code is merged.
6. Protect production deployments — Always require a manual approval step or additional checks before deploying to production.
7. Keep pipeline files in version control — The pipeline definition should live in the repository and be reviewed like any other code change.
8. Monitor pipeline health — Track metrics like pipeline duration, failure rate, and deployment frequency to identify bottlenecks and improvements.

Class Sessions
Sales Campaign

We have a sales campaign on our promoted courses and products. You can purchase 1 products at a discounted price up to 15% discount.