Ansible is an open-source automation tool that simplifies IT tasks like configuration management, application deployment, and orchestration.
Developed by Red Hat, it stands out for its agentless architecture, you don't need to install software on managed nodes, making it easy to set up and scale. Instead, it uses SSH to connect and execute tasks, pushing changes from a control node.
Why Choose Ansible?
Ansible excels in modern DevOps environments due to its simplicity and power. Here's what makes it a go-to tool:
1. Agentless operation: Runs over SSH (or WinRM for Windows), reducing overhead and security risks.
2. Idempotency: Tasks only apply changes when needed, ensuring consistent results without side effects.
3. Human-readable YAML: Playbooks (automation scripts) use simple YAML syntax, readable even by non-programmers.
4. Push-based model: The control node initiates actions, ideal for managing fleets of servers.
5. Extensible modules: Over 3,000 built-in modules handle everything from package installs to cloud provisioning.
Compared to tools like Puppet or Chef (pull-based and agent-heavy), Ansible prioritizes speed and minimal setup, perfect for teams adopting automation quickly.
Key Concepts
Ansible revolves around a few core building blocks. Understand these to grasp how it automates configurations:
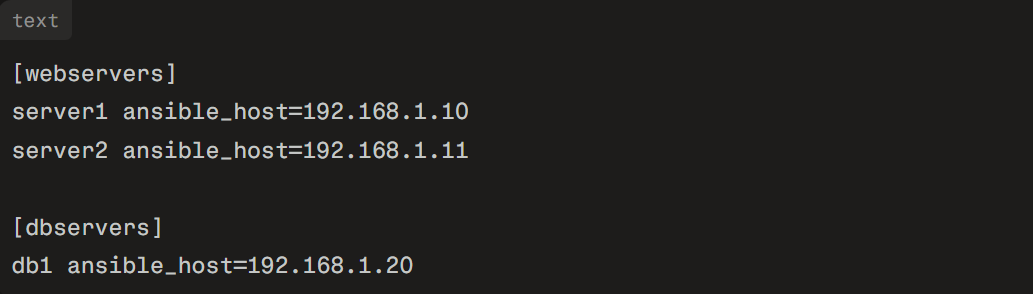
1. Inventory: A simple file (INI or YAML) listing managed hosts, grouped for targeted execution. Example:
2. Modules: Reusable units for tasks, like apt for package management or copy for file transfers. Run ad-hoc with ansible webservers -m apt -a "name=nginx state=present".
3. Playbooks: YAML files defining workflows as "plays." A play targets hosts and runs tasks in sequence.
4. Tasks: Individual steps in a playbook, each calling a module with parameters.
5. Roles: Reusable bundles of tasks, variables, and files for modularity—think of them as templates for common setups like web servers.
These concepts enable declarative automation: you describe the desired state, and Ansible makes it reality.
Installation and Setup
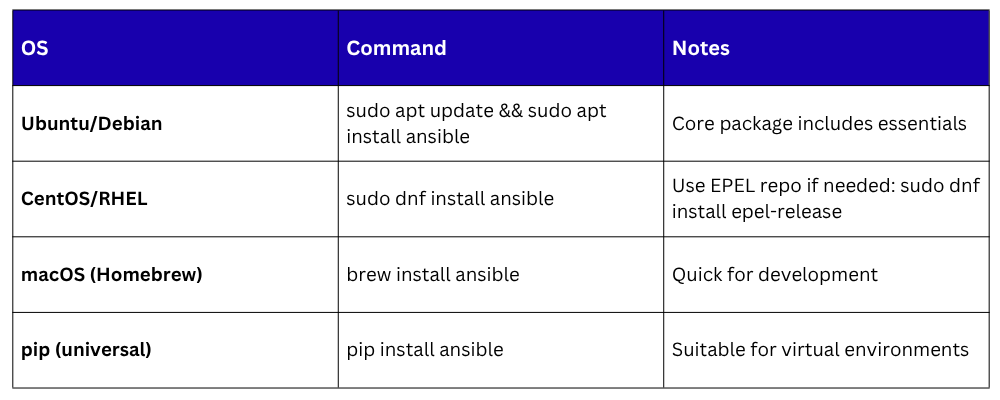
Getting started is straightforward. Install Ansible on your control node (Linux/macOS recommended) via package manager.
Verify with ansible --version. Test connectivity: ansible all -m ping -i inventory.ini. Success shows "pong" from each host.
Running Your First Playbook
Create a simple playbook, deploy_nginx.yml, to install and start Nginx on web servers:
text
---
- name: Install and configure Nginx
hosts: webservers
become: yes # Run as sudo
tasks:
- name: Update apt cache
apt:
update_cache: yes
- name: Install Nginx
apt:
name: nginx
state: present
- name: Start Nginx service
service:
name: nginx
state: started
enabled: yes
Execute it: ansible-playbook -i inventory.ini deploy_nginx.yml. Ansible connects, applies tasks idempotently, and reports changes. Output shows green (ok), yellow (changed), or red (failed) for each task.
Best Practices for Beginners
1. Start small: Use ad-hoc commands for quick tests, like ansible dbservers -m user -a "name=deploy state=present".
2. Organize with roles: Structure projects as roles/myrole/tasks/main.yml for reusability.
3. Use variables: Define in group_vars/webservers.yml for flexibility, e.g., nginx_port: 8080.
4. Secure it: Enable key-based SSH, limit inventory access, and use Ansible Vault for secrets (ansible-vault encrypt secrets.yml).
5. Test in stages: Run with --check mode to simulate without changes.
Ansible scales from laptops to thousands of nodes via Ansible Tower/AWX for enterprise features like RBAC and scheduling.

Class Sessions
Sales Campaign

We have a sales campaign on our promoted courses and products. You can purchase 1 products at a discounted price up to 15% discount.