AWS provides two native services that work together to create a fully automated pipeline — CodePipeline orchestrates the flow, and CodeBuild does the actual building and testing. Together, they form the core of an AWS-native CI/CD setup.
The Two Services
AWS CodePipeline
CodePipeline is the orchestrator. It defines the stages of your pipeline — source, build, test, deploy — and controls the flow of code through each stage. When something changes in your repository, CodePipeline detects it and kicks off the entire process automatically.
Think of CodePipeline as the manager that coordinates the workflow.
AWS CodeBuild
CodeBuild is the worker. It takes your source code, runs commands you define — install dependencies, run tests, compile code, create deployment packages — and reports the result back to CodePipeline.
Think of CodeBuild as the machine that actually does the building and testing.
How They Work Together

Every pipeline has at least two stages. Most have three or more.
The buildspec.yml File
CodeBuild is controlled by a file called buildspec.yml that lives in the root of your repository. This file tells CodeBuild exactly what commands to run and in what order.
yaml
version: 0.2
phases:
install:
runtime-versions:
python: 3.11
commands:
- pip install -r requirements.txt
pre_build:
commands:
- echo Running tests
- pytest tests/
build:
commands:
- echo Build started
- zip -r app.zip . -x "*.git*"
post_build:
commands:
- echo Build completed successfully
artifacts:
files:
- app.zip
```
### The Four Phases
| Phase | Purpose |
|---|---|
| **install** | Set up the environment — runtime versions, tools |
| **pre_build** | Run tests, linting, security scans before building |
| **build** | Compile code, create deployment package or Docker image |
| **post_build** | Notifications, cleanup, post-processing |
---
## 4. Setting Up a Pipeline — Step by Step
### Step 1 — Create a CodeBuild Project
```
AWS Console → CodeBuild → Create build project
Project name: my-app-build
Source: AWS CodeCommit → select your repository
Environment: Managed image → Amazon Linux → Standard runtime
Buildspec: Use buildspec.yml file in source code
Artifacts: Amazon S3 → select your artifact bucket
```
### Step 2 — Create the Pipeline in CodePipeline
```
AWS Console → CodePipeline → Create pipeline
Pipeline name: my-app-pipeline
Service role: Create new role (AWS manages permissions)
Source stage:
Provider: AWS CodeCommit (or GitHub)
Repository: your-repo
Branch: main
Detection: Amazon CloudWatch Events (triggers on every push)
Build stage:
Provider: AWS CodeBuild
Project: my-app-build
Deploy stage:
Provider: Amazon S3 (for static apps) or AWS CodeDeploy (for servers)
Bucket: your-deployment-bucket
Step 3 — Test the Pipeline
Push a change to your repository and watch the pipeline run automatically in the CodePipeline console. Each stage shows a progress indicator — green for success, red for failure.
IAM Permissions Required
CodePipeline and CodeBuild need IAM roles to interact with your AWS resources. AWS creates these automatically when you use the console, but it is important to know what they need:
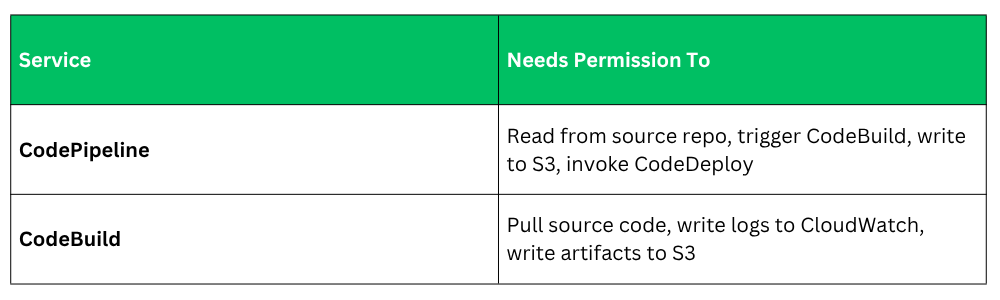
Always scope these permissions to specific resources — not * — following least privilege.
Adding the Pipeline to Your Repository
For teams using GitHub, you can also define your pipeline as code. Store your buildspec.yml in your repository so it is version-controlled alongside your application code. This means:
1. Pipeline changes go through pull requests and code review.
2. You can roll back pipeline changes just like application changes.
3. Every developer can see exactly how the build works.